
How to Deploy a Free Website and CI/CD-Pipeline Using Azure and GitHub
As many others I started my personal website journey with Wordpress. Since it is the most popular content management systems and is supported by a large community of developers it became the go-to solution. Especially if one considers the fact that endless hosting providers offer Wordpress instances as managed services.
But at times Wordpress can be an overkill in complexity and cost for small personal projects. When your budget is small and your spare time is limited there are the following caveats with Wordpress (and other dynamic frameworks of course) which make it difficult to host it as a free website:
- You need a web server capable of preprocessing php scripts
- You need a relational database which has to be hosted somewhere
- You have to maintain it by installing software updates and manage plugins
- You have to deal with security issues
- You have to spend money for a lot of services and functions you might not need
The alternative to dynamic websites: static websites
The simple question now is: how to avoid those caveats and deploy a website for free? The answer is simple and not really new: static websites!
Static websites neither require web servers to have preprocessing capabilities nor do they rely on databases. Therefore operation is less complex which eases maintenance tasks as software updates or security considerations.
For instance one can just upload a bunch of HTML hyperlinked documents to AWS S3 and boom - your static website is live! But what about cost? What about routing? What about managing the content? What about development workflow? All good questions I will tackle in the following.
How to actually deploy a static website and CI/CD pipeline using Azure services and GitHub for free
A possible solution to deploy a free static website including a CI/CD pipeline is a combination of three building blocks Azure Static Web Apps Service, GitHub Workflows and your favorite DNS provider as shown in the image below.
Target architecture of free static website and CI/CD pipeline
The target architecture may look a little messy at first glance but don’t worry. Lets just focus on the benefits before we go to the explanations:
- Free hosting of your personal website on Azure
- You can automatically deploy content on your website with every push to GitHub and GitHub Actions CI/CD
- You don’t have to deal with operational tasks for web servers, databases, content management systems and SSL certificates
So let’s break down on how to get there. Of course after we have made sure that the following resources are available:
- A GitHub repository with your static website project (Hugo, Gatsby or VuePress) and rights to modify ci/cd workflows
- An Azure account with appropriate access rights (subscription, resource group & Azure Static Web App Service)
- A DNS top level domain (apex) at your disposal
- (Optionally) A service account in GitHub with access to the static website repository for production scenarios
1. GitHub: Set your static website repository up your free website
The first thing you will need is a GitHub repository that contains your static web app files for your free website. Luckily Azure Static Web Apps supports static website generators as Hugo, Gatsby and VuePress. Therefore we will continue with a Hugo project. As soon as we have setup a repository, a target branch (e.g. master, production etc.) that will reflect our most recent product version we are got to go.
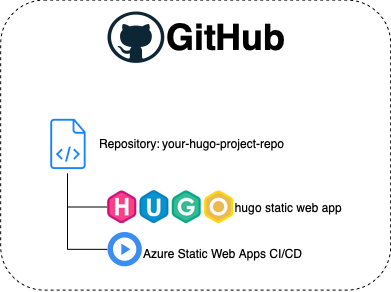
Setup Hugo static website repository in GitHub
Since there are a lot of generators available out there which are not supported by Azure Static Web Apps this has to be considered when choosing a framework.
2. Azure: Deploy your static website with Azure Static Web Apps Service
The next step is to provision the Static Web Apps Service in Azure. If you use Azure Portal just follow the instructions according to the service documentation and make sure you select the options Plan Type = Free and Deployment details = GitHub.
In the next step you will have to authenticate with GitHub, select your static website repository and specify the branch Azure shall monitor for changes. Select the predefined Hugo build template in the Build Presets setting.
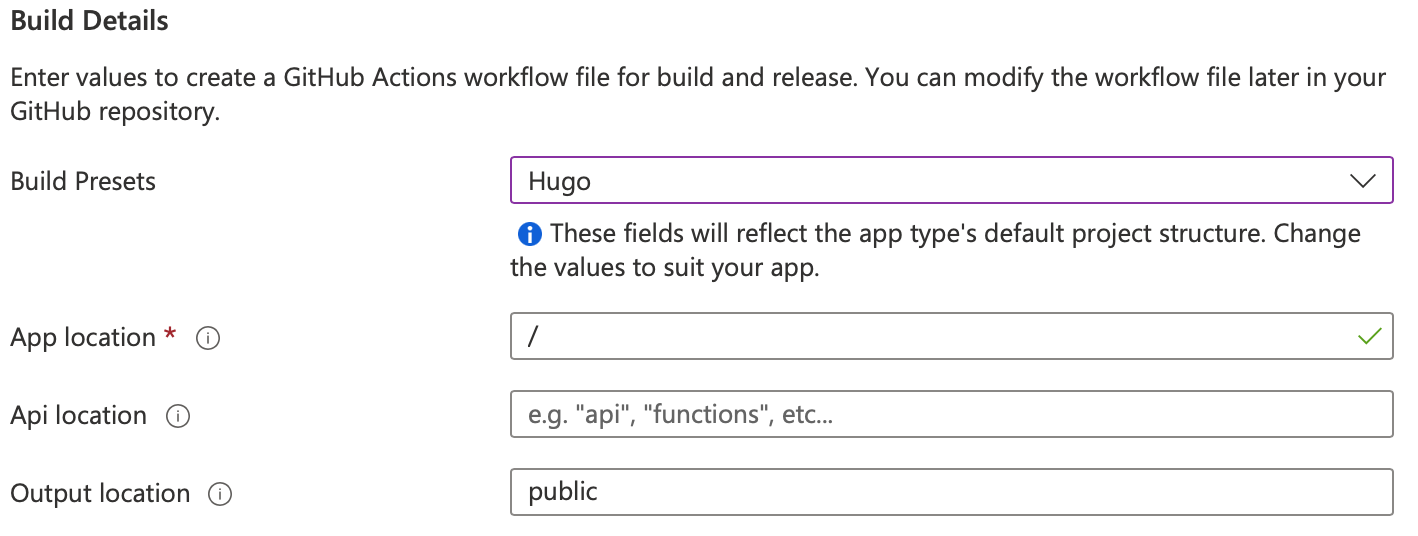
Select Hugo build template in Azure Portal
With this option Azure Static Web Apps service will install a GitHub Workflow to your selected repository. This workflow will pre-process your static website project each time you push to the selected branch and will upload the generated files directly to Azure. So each commit will later translate to changes on your website automatically.
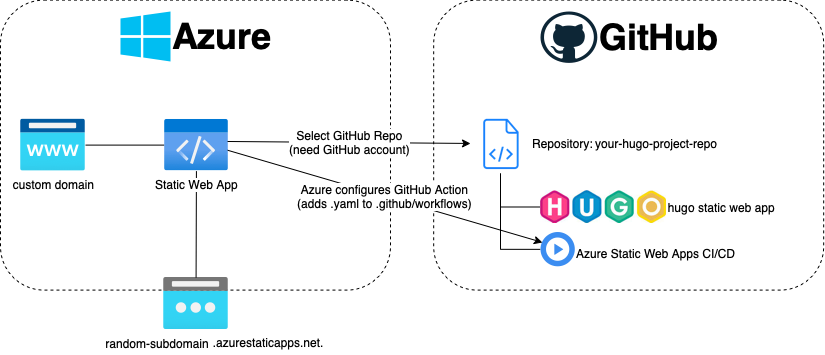
Setup Azure Static Web Service with GtHub
(Optional) If you want to use this deployment scenario for production you should definitely consider adding a non-personal service account that Azure Static Web Apps can use to monitor and fetch new commits.
3. DNS: Configure your DNS record to make your app visible
After you have finished the deployment process in Azure your website should be publicly accessible through some randomly generated subdomain. To configure a custom domain some modifications are needed in Azure and your DNS records.
In Azure Portal you have to navigate to your newly created Azure Static Web Apps resource and check the Settings sections for the custom domain setting. There you will have to add an apex domain and www-subdomain. Configuration instructions will be provided during the setup and must be applied to your DNS records as shown in the target picture initially introduced above.
Interestingly Azure does not offer DNS registration services. Therefore you will rely on a third party as GoDaddy.com or Strato.de as domain registrars.
Check the Microsoft Docs for further readings.
Final conclusion
After following this process one will have running public free website with almost zero cost and maintenance efforts. If you use your own domain you will still need to chip in some coins. But it’s optional ;).
What I really like about this solution is that it is straight forward and that it allows you to manage your content with your IDE. You just have to push your changes to your repository and soon it will appear on your website after it went through the GitHub workflow. And since one can use some predefined templates in Azure it is pretty easy to setup.
One major drawback of course is: You don’t get the web-based WYSIWYG editor which can be very comfortable at times. But any IDE of your choice and hugo server -D for live rendering will do the job :).